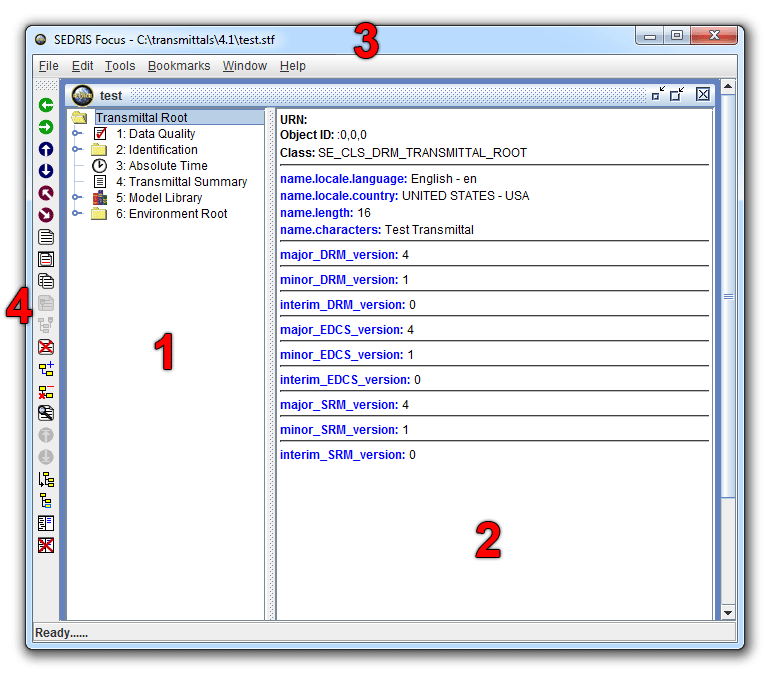
File Menu
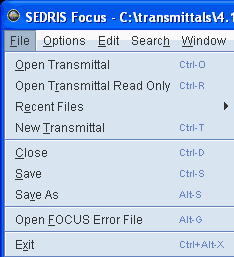
Open Transmittal
Open a transmittal using the File->Open Transmittal menu option. Shortcuts for
opening recent transmittals are available at the
bottom of the File menu under Recent Files. The number
of shortcuts saved can be specified in the
Options->Preferences->System pane.
Return to: Top
Open Transmittal Read Only
Open a transmittal using the File->Open Transmittal Read Only menu option. Same
as Open Transmittal but when opened in read only mode, the transmittal cannot be
edited. Shortcuts for opening recent transmittals are
available at the bottom of the File menu under Recent Files.
The number of shortcuts saved can be specified in the
Options->Preferences->System pane.
Return to: Top
Recent Files
By hovering the mouse cursor over the Recent Files menu item a sub-menu will pop up
and display a number of recently opened or created transmittal files. Clicking on
one of these will re-open that transmittal, in the same mode (Read Only or Editable), in a new View pane. The number of recent transmittals saved can be specified in the
Options->Preferences->System pane.
New Transmittal
When you create a new transmittal a default transmittal displayed. It contains
only a <Transmittal Root>. This can be used as a workspace for building,
cutting, and pasting objects to and from other transmittals.
Close
Use the Close menu item when you want to close all open Views of the currently
selected Transmittal.
Save
Use this menu item to flush all recent edits on the current transmittal to the disk.
This is very handy when you want to run an application such as depth or the checkers
on the transmittal that you've been editting. In previous versions of this tool you
would have been required to close the transmittal and Focus to save your changes
before running an application.
Save As
Use this menu item to flush all recent edits on the current transmittal to the disk
and change the name of the transmittal. Please note that you need to have at least 2.5
times the hard disk space as the size of the transmittal that you are saving to a
different name.
Open Focus Error File
Two of the applications, Syntax Checker and Rules Checker, will output an
Error file by default. This file can be displayed by clicking the Show Errors
button on the Results window. The Errors will then be displayed in a
separate window. Clicking on an Error's Object ID button will select that
object in the View pane. Error files can be saved and viewed using this
menu item.
Exit
This item will close all transmittals and then shutdown the Focus application.
Options Menu

Preferences
The following features are user configurable through this menu item:
System Preferences
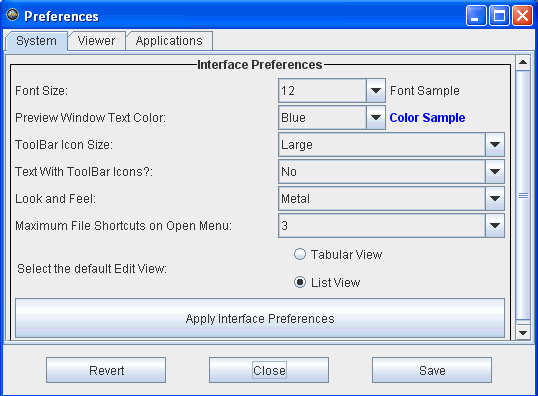
The System preferences are the default parameters for display and
editing. Users can configure the display font size, look-and-feel, and the object
editing display format among others. Please see Edit under
the Edit Menu for more information about the default Edit View
option.
Return to: Top
Viewer Preferences
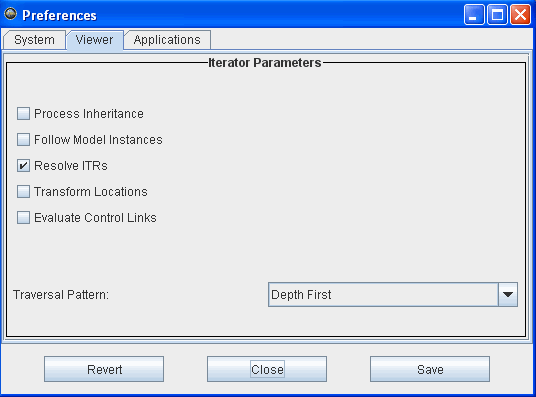
The Viewer preferences specifies how the transmittal is traversed and
displayed in the View pane.
Return to: Top
Application Preferences
The Applications Preferences can be used to either add new applications to Focus or
modify current applications.
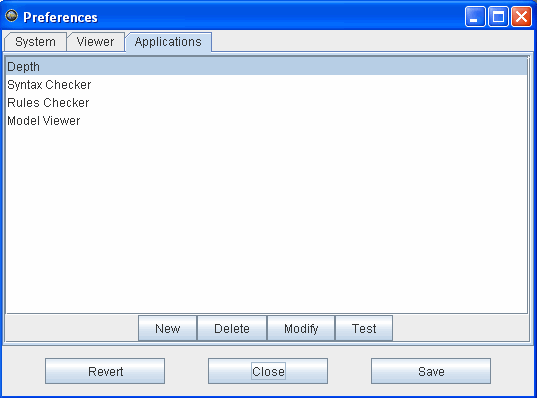
To add an application, Click on the "New" button then specify an
application label, a short description to be displayed with the About button,
the path to the executable, and any command line arguments you want to add.
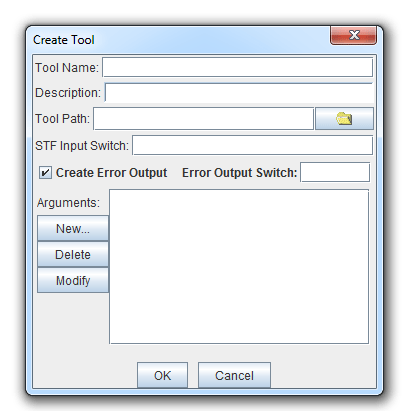
The currently available argument types are:
- Starting Object: used for the Starting Object ID
- Option: checkbox for a Boolean argument
- Integer:integer argument
- Integer with Option: integer with a checkbox for whether it should be
used or not
- Enumeration: enumerated list where one option is selected
- File: file name
- File with Option: file name with a checkbox for whether it should be
used or not
- String: string argument
An example of an Enumeration argument can be seen below.
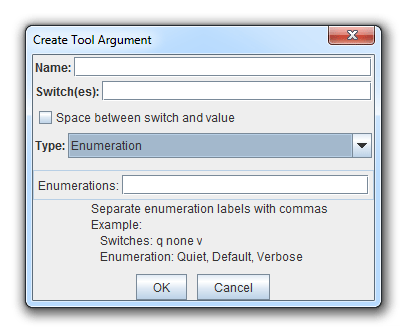
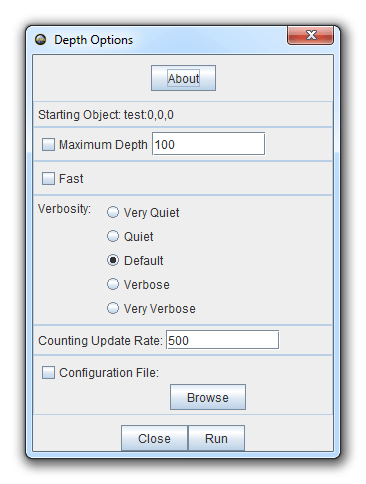
Focus automatically builds a run window for each application according to the options
saved, as seen in the following example for running the Depth application:
Return to: Top
Edit Menu
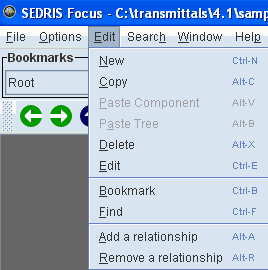
The Edit menu and the object right click menu are almost the same. Many of the
options presented on the Edit Menu are also on the Toolbar.
New
Please refer to the description of this menu item under the
Toolbar.
Return to: Top
Copy / Paste Object / Paste Tree
Please refer to the description of this menu item under
the Toolbar.
Return to: Top
Delete
Please refer to the description of this menu item under
the Toolbar.
Return to: Top
Edit
Please refer to the description of this menu item under
the Toolbar.
Return to: Top
Bookmark
Please refer to the description of this menu item under
the Toolbar.
Return to: Top
Find
Please refer to the description of this menu item under
the Toolbar.
Return to: Top
Add a relationship
Please refer to the description of this menu item under
the Toolbar.
Return to: Top
Remove a relationship
Please refer to the description of this menu item under
the Toolbar.
Return to: Top
Search Menu

OME Match
The first window that you'll see is the OME Match window.
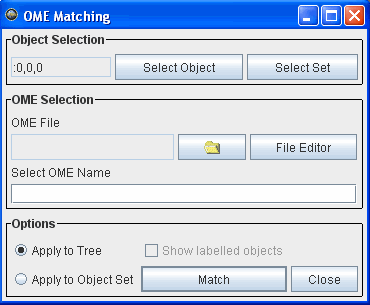
- Object Selection:
- You can either select an object from the transmittal or you can select an XML object set file.
- OME Selection:
- In this section you'll need to select an OME file and also type in the OME name that you
want to match from that file. You can use the File Editor button to view and edit the OME file
and copy and paste the OME name to the OME name box.
- Options:
- In this section you'll need to select whether or not you want the OME to match on the
tree of the selected object or only on the object(s).
- The OME file editor window
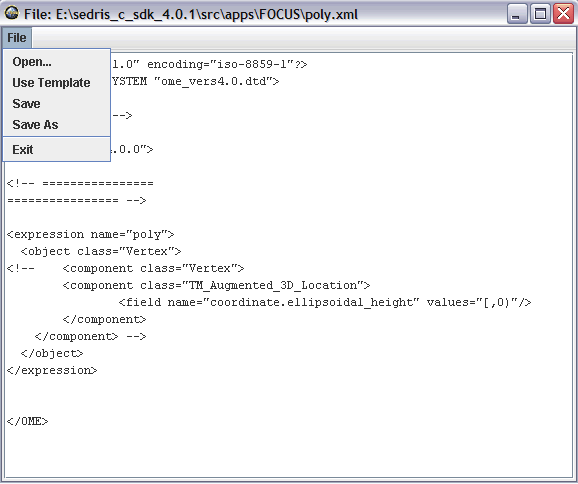
- The OME editor is a basic text editor. You can use the
basic editing control keys such as Control-X (Cut), Control-C (copy), and Control-V (paste)
keys. There is also an option on the editor's File Menu to "Use Template". This
menu item replaces what's in the current window with a basic template for an OME file. Just
replace the values that say "insert_something_here" and save it. Whenever you save,
save as, or open a file, the name of that file is adjusted in the OME Match window's OME File
field.
When you've filled in all this information then select the Match button.
The Matches Window
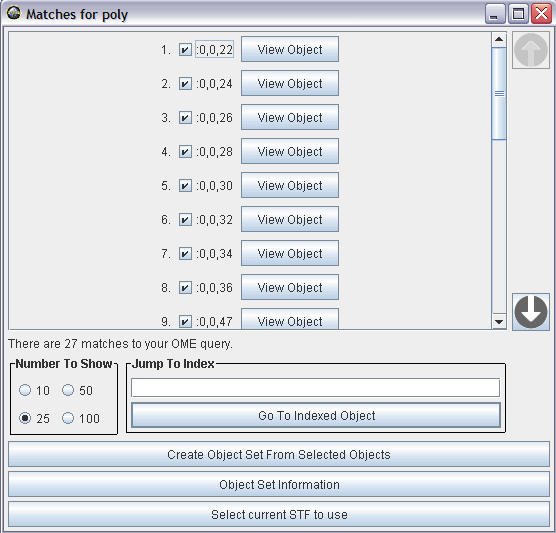
If there are any matches to your search then the matches window will appear. If the OME
search takes more than a few seconds then a progress bar window will appear with the time
elapsed. Also on this progress bar window is a button to stop the OME search. If you stop
the OME search before it completes it will show you the matching objects that the OME search
found up to the point that you stopped it. The matches window has the following sections:
- Matching Objects section
- The objects that were found during the OME search will be displayed here. Each object has
an index number that indicates the order that the objects were found. Next to the index number
is a checkbox. Initially, all objects are selected. The checkbox coincides with the object
set creation button. The objects that are selected will be saved as part of your object set.
The next item is the object's ID. And last is the View Object button. When clicked, the object
will become focused in the transmittal's View Pane. For version 4.0.1.2
this function does not work for ITR objects that were found during the search.
The number of matching objects shown in this section is determined by the number selected
in the Number To Show section. The scrollbar, if present, cycles through the
Number To Show objects while the arrows to the right of the objects cycle through the
entire set Number To Show objects at a time.
- Number of Matches Label
- The number of matches resides directly under the Matching Objects section and displays
how many total matching objects were found.
- Number To Show section
- The number of matching objects shown in the Matching Objects section is determined
by the number selected here. The scrollbar, if present, cycles through the
Number To Show objects. Selecting a number here automatically resizes the set of
objects in the Matching Objects section.
- Jump To Index section
- Type in a number, in the range of 1 to the total number of matching objects or 100,000
(whichever is less), into the text area and click on the Go To Indexed Object
button and the object corresponding to it will be brought into view. It was decided
that individual manipulation of objects in sets greater than 100,000 was just too
unmanageable.
- Button section
- Object Set Creation Button
- Create a new object set by selecting the Create Object Set From Selected Objects
button. All the matching objects that are selected using the checkboxes will be saved into
an XML object set or a plain text file. If you save an XML object set it can be used
to narrow the results by running a new OME on the new XML object set.
- Object Set Information Button
- The Object Set Information currently consists of the originating transmittal, the original
OME name, and the original OME file name.
- STF Selection Button
- Use this button to change the transmittal that the View Object button applies to.
Simply select the transmittal that you want to use in the main Focus window and then select
this button.
Return to: Top
Open OME Object Set
Opening an OME object set just requires you to select an XML object set file from the chooser.
Once the file has been selected it brings up a window similar to the Matches
Window.
Window Menu
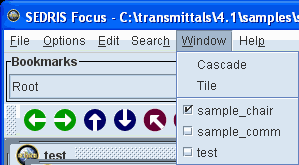
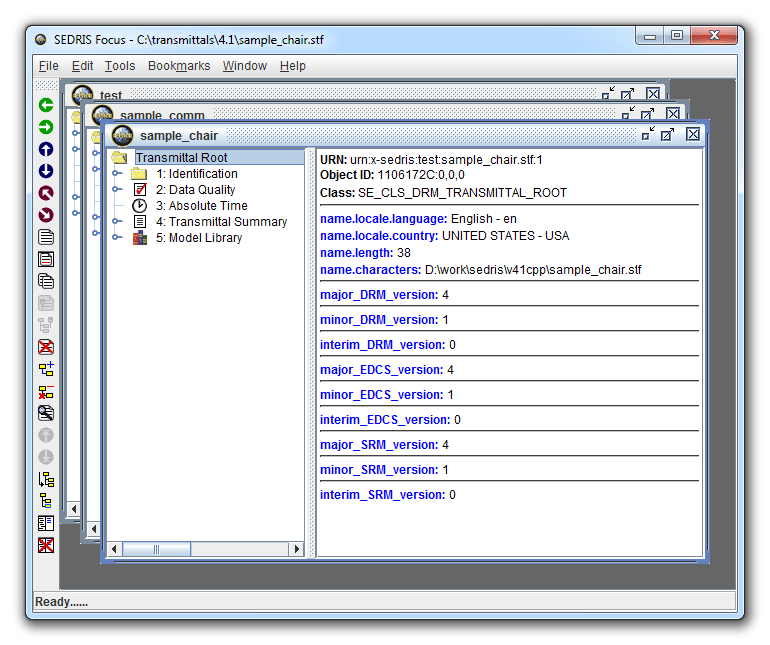
Cascade
This option will rearrange the current windows into a cascade formation as seen below:
Return to: Top
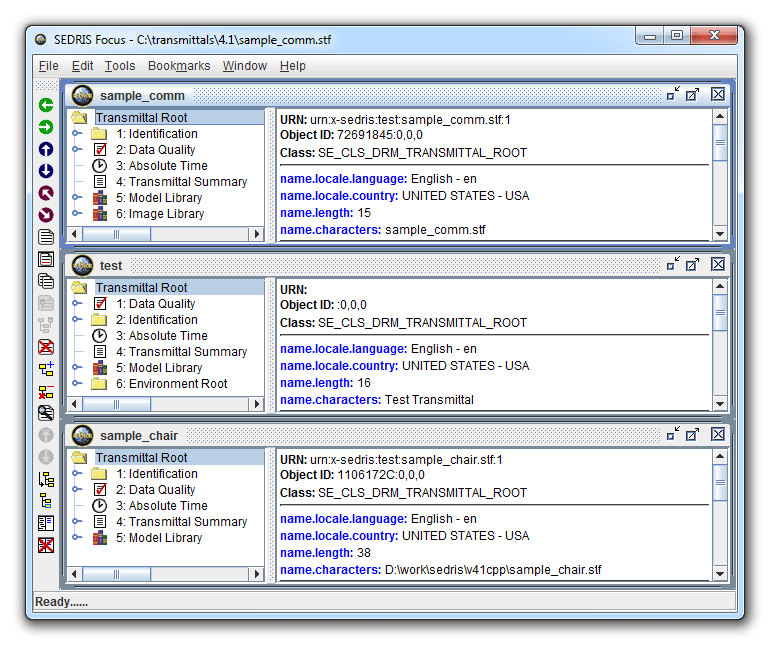
This option will rearrange the current windows into a tile formation as seen below:
Return to: Top
This section of the menu shows all the windows currently in the Edit area. Select one to bring that
window to the front if it's hidden and to expand the window if it's minimized.
Return to: Top
Help Menu
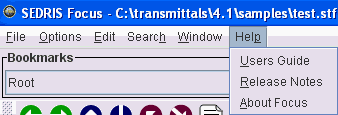
Users Guide
This document.
Return to: Top
The Release Notes document describes the specific related to each release
of this application. For example it describes the basic capabilities of Focus, the
platforms and libraries it's compatible with, and the changes made for this release
and previous releases.
Return to: Top
About Focus
This is a short description of the Focus application, it's version number, and what
SEDRIS library it's compatible with.
Return to: Top

The Toolbar has buttons for editing and browsing transmittals. The Toolbar can
be dragged to any side of the view pane or can be a floating window.
Additionally, some of the Toolbar functionality is available via a
right-click popup menu on the left side of the View pane and also in
the Edit Menu.
Aggregate/Component Object

Aggregate and Component Objects are tree navigation buttons for selecting the
aggregate or component of the selected obejct in the tree hierarchy. For example if
a <Geometry Model> is selected through the associated <Geometry Model Instance>
then by clicking on the Aggregate button the aggregate of the <Geometry Model>,
which is a <Model>, will be selected.
Return to: Top
Previous/Next Sibling

The Previous and Next Sibling buttons are tree navigation buttons for objects at the same
level in the tree hierarchy under a single aggregate. For example if a <Table Property Description>
has four direct component <Property Characteristic>s and the first one is selected, clicking on
Next Sibling will move the selection to the next direct component <Property Characteristic>.
Return to: Top
Step Up/Down (in the view tree)

The Step Up/Down buttons are the simplest navigation buttons and just step up or down in the
view tree..
Return to: Top
New

This item brings up an interface for creating a new object.

The newly created object will be pasted as a component of the
currently selected node. The object's fields will be initially set to default values.
Return to: Top
Delete

Deletes the currently selected node, all relationships to / from it, and the
tree below it.
Return to: Top
Edit

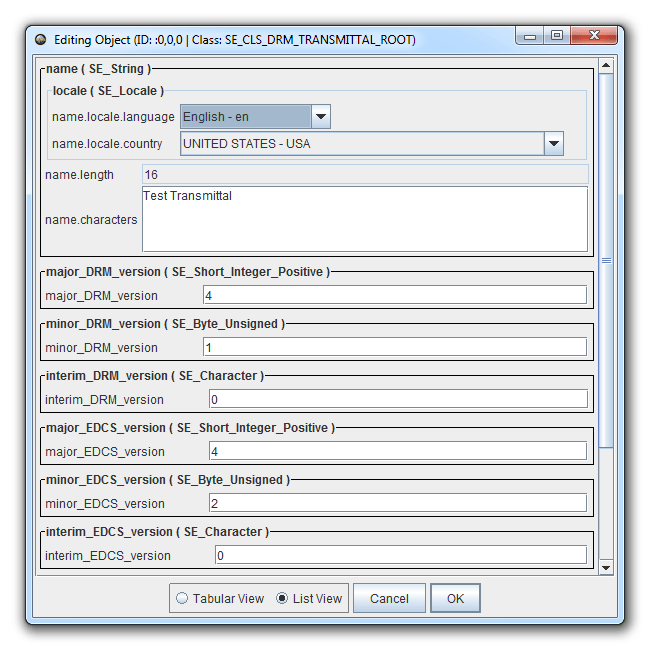
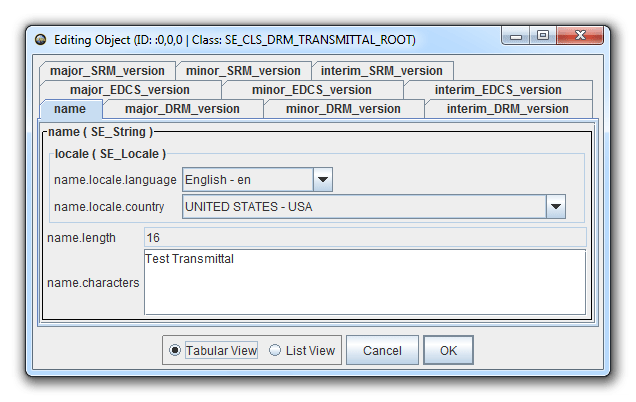
Edit allows an object's attributes to be edited. All object classes are
supported. There are two views of of the editing window:
The List view lists all the field values in a scrollable pane.
The Tabular view displays one field at a time and the user can select
which to display by using the field tabs.
Return to: Top
Copy / Paste Object / Paste Tree

To make a copy of an object or tree, first select the object and then select
Copy in either the Edit Menu, the right click menu, or
the Toolbar. Once Copy is applied to the
currently selected node, you can then select a node under which the
copied node is to be created as a component. If you want to just copy the object by
itself then just select Paste Object. If you want to copy the object and it's entire
tree then select Paste Tree.
Return to: Top
Add Relationship

This button allows you to add either a component or a one-way/two-way associate
relationship. The currently selected node will automatically be added to the aggregate
or from object area when you click on this button. It can be changed at will by
selecting another node in the View Pane and then clicking on the button below the
object ID area for the aggregate/from object marked 'Get currently selected
node for this object'. To select a component/to object follow
the same procedure for changing the aggregate/from object and then click on the button
below the object ID area for the component/to object marked 'Get currently selected
node for this object'. After you choose both objects, either a green checkmark or
a red 'x' will show up to let you know if the relationship that you propose
to create is valid or not.
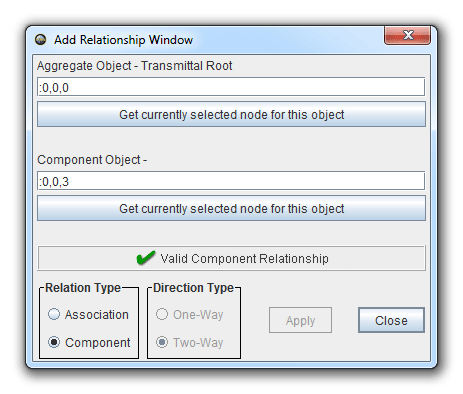
To create a component relationship, between the two objects you have selected,
click on 'Component' under the 'Relation Type'. To create an associate relationship,
between the two objects you have selected, click on 'Associate' under the 'Relation
Type'. If you select 'Associate' from the 'Relation Type' then the 'Direction Type'
box becomes active. Once the 'Direction Type' box becomes active then you need to
select whether you want a one-way or a two-way relationship.
If you don't see a green checkmark and you select the 'OK' button, nothing will
happen. It will act the same as the 'Cancel' button. However if you do see a green
checkmark then a relationship will be created.
Return to: Top
Remove Relationship

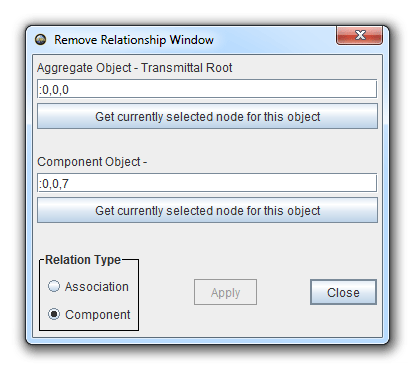
This button allows you to remove either a component or a one-way associate
relationship. The currently selected node will automatically be added to the aggregate
or from object area when you click on this button. It can be changed at will by
selecting another node in the View Pane and then clicking on the button below the
object ID area for the aggregate/from object marked 'Get currently selected
node for this object'. To select a component/to object follow
the same procedure for changing the aggregate/from object and then click on the button
below the object ID area for the component/to object marked 'Get currently selected
node for this object'. Regarding removal of associate relationships, this is only a
one-way removal. To remove a two-way association you need to remove both of the
relationships separately.
Return to: Top
Find

Find allows an object to be selected and displayed in the view window by
specifying either the object's complete Object ID,
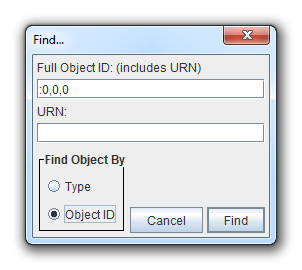
or by specifying a DRM class type and finding the first object of that
class in the tree hierarchy.
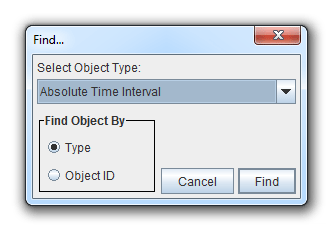
When using the DRM class type to search for objects, the
Previous Type/Next Object of Type toolbar buttons
become active to search forwards and backwards through the list of found
objects matching the type specified.
Return to: Top
Find Previous/Next Object of Type

Once an object of a DRM class is found using the Find
by DRM class type, the Previous and Next Type buttons will become active and
when clicked will select and show the previous (or next) object of the same
DRM class type in the tree. This feature always starts with the top-most object
of the specified DRM class type in the tree.
Return to: Top
Bookmark

Objects can be bookmarked for easy reference. To bookmark an object, select the
object in the left side of the View Pane and click the Bookmark tool on the
Toolbar, the Edit Menu, or the right-click menu and then give it a name.
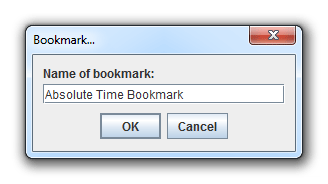
The bookmark name will appear in the Bookmarks Pane for that
View Pane. Selecting a bookmark from the list will cause that object to
be selected and displayed in the View Pane.
Return to: Top
Focus

Focus simply scrolls the selected object back into the view window. It is
useful for large transmittals where it is easy to lose sight of the selected
item when scrolling through large tree structures.
Return to: Top
New/Delete View

There can be multiple View Panes for one transmittal. Each view pane can
display a different segment of the transmittal and have a different object
selected. To open another View Pane for the transmittal currently being
displayed, hit the New View button on the toolbar. To delete the currently
displayed View Pane, use the Delete View button on the right side of the
toolbar. If all the view panes for a transmittal are deleted, the
transmittal will be closed. To close all the View Panes associated with the
currently selected one use the Close menu item on the
File Menu.
Return to: Top
An application can be run on the currently selected transmittal by choosing the
application from the Applications Pane. If an object is selected and
the application takes a start object as a parameter, the application will be run
on that object, otherwise, the application will run on the Transmittal Root. A
window will be displayed, presenting an About button which gives a short description
of the application, and inputs for any command-line parameters. The application
will be run in a separate process and the output will be displayed in a Results
window. The application may be terminated while running by clicking the Kill
Process button on the Results window. Focus includes three SEDRIS applications:
Depth, Syntax Checker and Rules Checker. Shown below is the window for the Depth
application before it is run:

The following image shows the output window and the associated buttons:
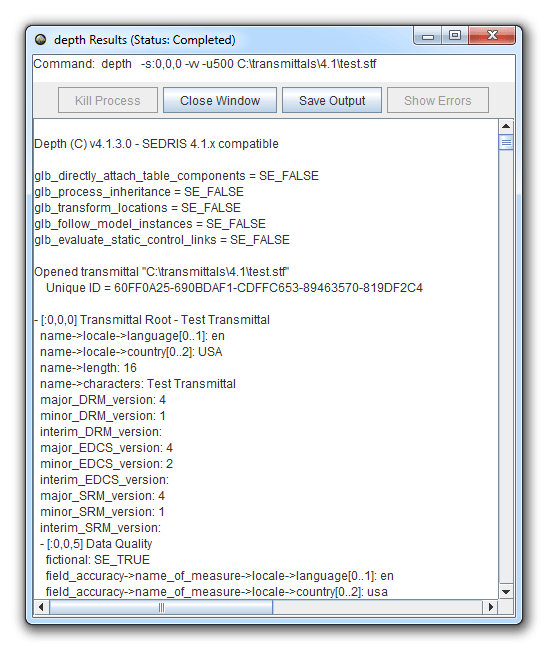
Two of the applications, Syntax Checker and Rules
Checker, will output an Error file. This file can be displayed by clicking the
Show Errors button on the Results window. The Errors will be displayed in a
separate window as shown below:
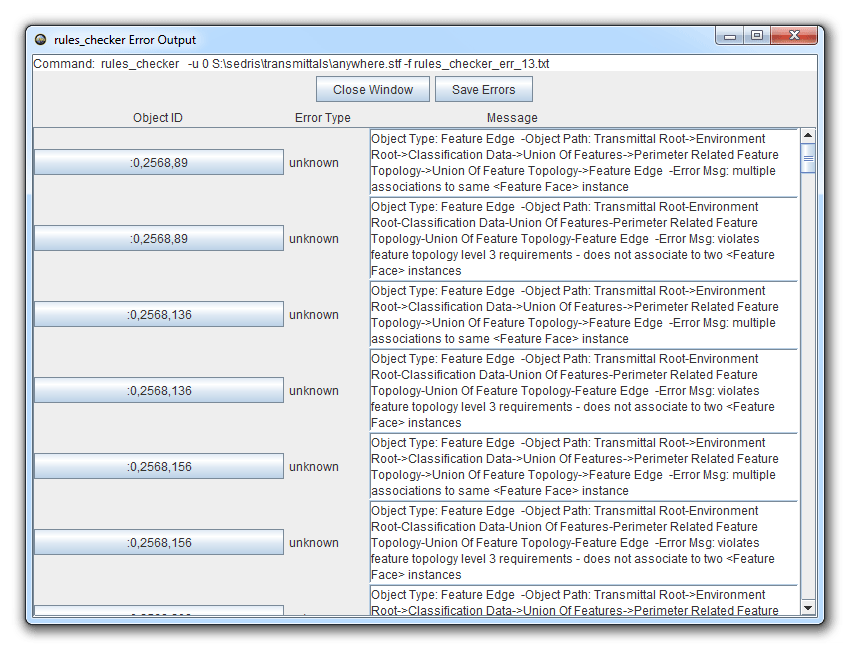
Clicking on an Error's Object ID button will select that
object in the Focus Viewer pane. For version 4.0.1.2 this button
does not work for ITR objects. Error files can be saved and viewed using the
File->Open Focus Error File option.
Return to: Top
